
- home
- BAKERECIPES
BakeRecipes
Bringing real baking into your home with deliciously simple recipes.
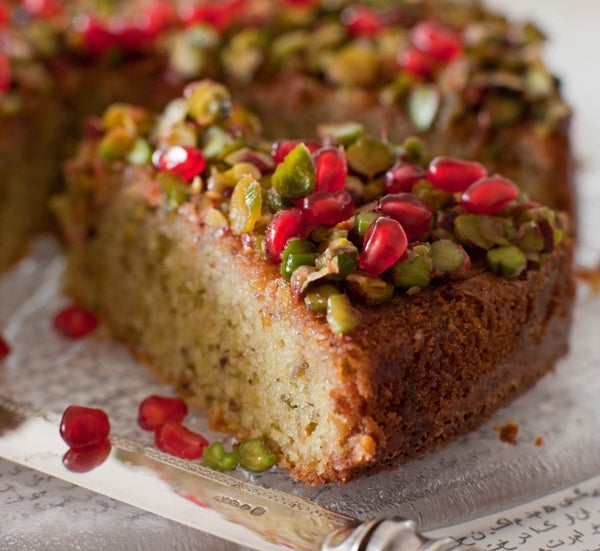
Makes 8 serves
The recipe for this lovely, tangy cake was given to me by the wonderful food writer and cooking teacher Elise Pascoe, and I have made it time and again since she passed it on to me. The original version was made with lemons; however, as our lime trees are such bountiful providers for so much of the year, I tend to make it with limes instead. It’s a gorgeous, simple cake: light, tangy and so eye-catching with its mantel of pistachios and pale-green hue. In season, translucent beads of pomegranate look extraordinarily beautiful scattered over the cake, giving it a mysterious, exotic quality.
Just a note about the pistachios for this cake – to grind them, I pulse them in the food processor with a tablespoon of flour from the recipe, as the flour helps prevent them becoming oily and forming a paste. Nonetheless, you do have to be watchful as they can go from being perfectly chopped to pasty in the blink of an eye.
Ingredients
60g plain flour
1 teaspoon baking powder
100g pistachios, finely ground
finely grated zest of 3 large limes
120g almond meal
250g unsalted butter, at room temperature
200g caster sugar
4 (60g) eggs, at room temperature
⅓ cup (80g) pomegranate seeds, to decorate, optional
softly whipped cream or thick Greek-style yoghurt, to serve
Pistachio and lime syrup topping
90g caster sugar
½ cup (125ml) fresh lime juice (from approximately 3 large limes), strained
90g pistachios, roughly chopped
Method
- Preheat your oven to 170°C. Butter a 22–24cm round cake tin, line the base with buttered baking paper then dust the tin with flour. (I use a torte tin that I’ve had for years to make this – it has slightly sloping sides and measures 24cm across the top and 22cm across the base.)
- Tip the flour, baking powder, ground pistachios, lime zest and almond meal into a medium-sized bowl. Whisk them together with a balloon whisk for a minute or so, then set the bowl aside.
- Put the butter and sugar into the bowl of an electric mixer (or use a hand-held electric beater) and beat them on medium speed for about 4 minutes, stopping and scraping down the sides occasionally, until the mixture looks creamy. Beat in the eggs, one at a time, allowing each egg to be absorbed before adding the next. (Don’t worry if the mixture looks a little curdled after adding the last egg – it will come together again when you add the dry ingredients.) Tip in the flour mixture and mix everything together on low speed just until it is combined – be careful not to over-mix it, or the cake may be a bit tough. Scrape the batter into the prepared tin and smooth the top.
- Bake the cake for 45–50 minutes, or until it springs back when lightly pressed in the centre and a skewer inserted in the middle comes out clean. Transfer it to a wire rack and leave it to cool a little in the tin.
- When the cake is lukewarm, make the syrup. To do this, put the sugar and lime juice into a small saucepan over low heat and stir until the sugar dissolves. Add the chopped pistachios, increase the heat and bring the mixture to the boil.
- Turn the cake out onto a serving plate and peel away the paper. Slowly spoon the hot pistachio and lime syrup evenly over the top, then leave the cake to cool completely. Just before serving, scatter it with pomegranate seeds, if using. Serve with softly whipped cream or yoghurt.
This recipe is from Belinda Jeffery's In Belinda's Kitchen.
You can read more about what Belinda is baking this winter here.
Makes one 22cm cake
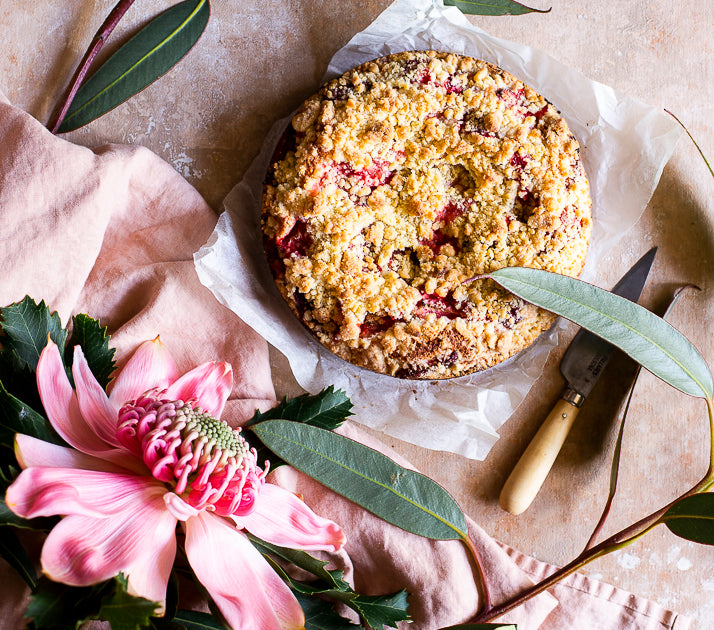
I don’t know about you, but lately I have taken great comfort in the known; in tried and tested cakes, and all things familiar. This cake is a real favourite of mine – simple, delicious and easily adaptable (surely good qualities for navigating life in general, really). I make it often with strawberries as pictured, or plums, but raspberries or ripe apricots would be equally lovely. It’s inspired by the streusel cakes I ate in Germany when I was an exchange student, and in the absence of seeing old friends there, I’ll eat this cake.
Ingredients
Streusel topping
60g butter, cubed
½ teaspoon vanilla bean paste
55g caster sugar
75g plain flour
Pinch of salt
Cake
125g unsalted butter, melted and cooled
3 eggs
1 teaspoon vanilla bean paste
100g plain flour
1 teaspoon baking powder
Pinch of salt
150g almond meal
185g caster sugar
375g strawberries, hulled and quartered
Method
- Preheat oven to 170°C (fan-forced) and grease a 22cm round springform tin well with butter and line the base with baking paper.
- Place streusel ingredients into a small mixing bowl and use your fingertips to work butter and vanilla through the sugar, flour and salt until mixture resembles large breadcrumbs. Set aside.
- Place melted butter, eggs and vanilla in a medium mixing bowl and whisk to combine. In a separate large bowl, sift together flour and baking powder, before stirring in salt, almond meal, and caster sugar. Make a well in the centre of the dry ingredients and pour in the melted butter and egg mixture, stirring gently to combine.
- Spoon batter into lined baking tin and smooth the top with a spatula before scattering with strawberry quarters. Sprinkle with streusel topping and bake for 55-60 minutes or until cake is cooked through and streusel is starting to colour.
- Allow cake to cool in the tin for 10 minutes or so before carefully releasing from the tin and placing on a wire rack to cool further.
- Slice into large wedges and serve cake warm with ice-cream or cream. Whilst best eaten the day it is made, any leftover cake will keep happily in an air-tight container in the fridge for a day or two, just warm slightly before serving.
This recipe is from Tilly Pamment's The Plain Cake Appreciation Society (Murdoch Books, RRP $39.99).
You can read more about what Tilly is baking this winter here.
Prep 30min (+5min standing time)Bake 1hr 5min-1hr 15minMakes 10-12 serves
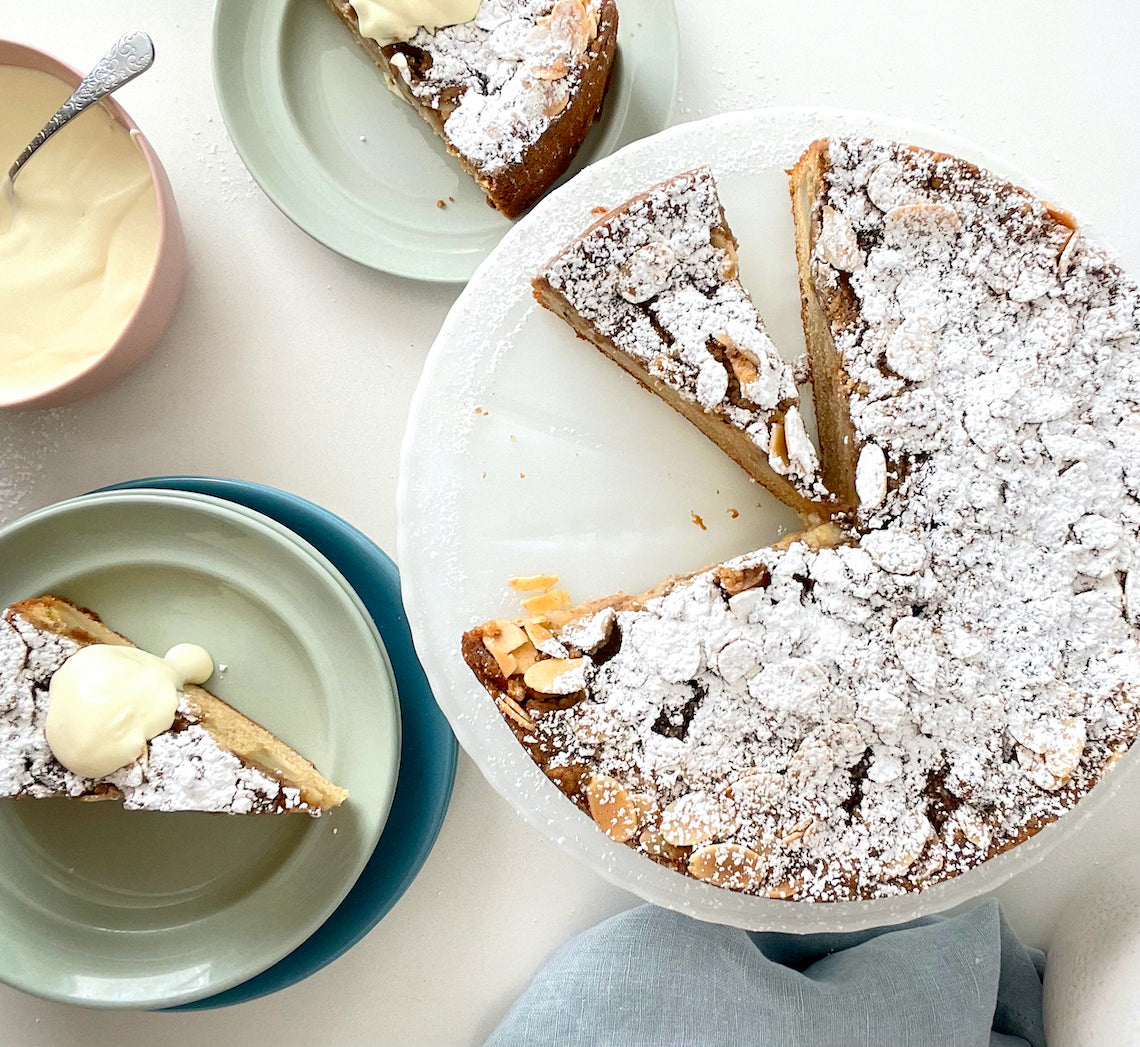
This is one of my favourite cakes – ever! Not only is it super easy to whip up and can be made with a whole variety of different fruits (you can replace the pears with the same quantity of plums, firm ripe nectarines or peaches for example), but it is also incredibly versatile when it comes to serving it. It not only makes for the perfect morning or afternoon tea cake but it is also wonderful served warm with lashings of cream or ice cream for dessert. I’ve also been known to eat the leftovers for breakfast (which I would also highly recommend!)
Ingredients
Melted butter, to grease
185g (1¼ cups/6½oz) self-raising flour
165g (⅔ cup, firmly packed/5¾oz) brown or raw caster sugar, plus 1 tablespoon extra
125g (4½oz) salted butter, at room temperature
85g (⅓ cup/3oz) sour cream
2 eggs, at room temperature
1½ teaspoons natural vanilla extract or essence
2 (about 200g/7oz each) firm but ripe Williams pears, cored and each cut into 12 wedges
Icing sugar, to dust
Cream or ice cream, to serve (optional)
Crumble Topping
50g (⅓ cup/1¾oz) plain flour
55g (¼ cup, firmly packed/2oz) brown or raw caster sugar
1 teaspoon ground cinnamon
60g (2oz) salted butter, chilled, diced
50g (½ cup/1¾oz) flaked almonds
Method
- Preheat oven to 170°C/340°F (150°C/300°F fan-forced). Grease a 21cm (81⁄4in), base measurement, springform tin with melted butter and line the base with non-stick baking paper.
- To make the Crumble Topping, combine the flour, sugar, and cinnamon in a medium bowl. Use your fingertips to quickly rub in the butter just until the mixture resembles coarse breadcrumbs (it will be quite moist). Stir in the almonds. Cover and put in the fridge while making the cake.
- To make the cake, place the flour, sugar, butter, sour cream, eggs and vanilla in a large mixing bowl. Use an electric mixer fitted with a paddle attachment to beat on low speed until combined. Increase the speed to high and beat for 3 minutes or until the mixture is well combined, very pale in colour and silky smooth in texture. Spoon the mixture into the prepared tin and smooth the surface with the back of a spoon.
- Toss the pear wedges with the extra 1 tablespoon sugar. Arrange the pears evenly over the top of the cake and then press gently into the batter. Sprinkle with the prepared Crumble Topping to cover.
- Bake in preheated oven for 65-75 minutes (the baking time will depend on how juicy the pears are) or until a skewer inserted into the centre comes out clean. Stand the cake in the tin for 5 minutes before transferring, still on the base of the tin, to a wire rack. Serve warm or at room temperature on its own or accompanied by cream or ice cream, if desired.
Variation
Brown Butter Pear Crumble Cake: Replace the butter in the cake with 125g (4½oz) brown butter, solidified but softened. Replace the butter in the crumble with 60g (2oz) browned butter, chilled and diced.
Prep 30min (+2hr cooling and overnight chilling time)Bake 45-50minMakes 8-10 serves
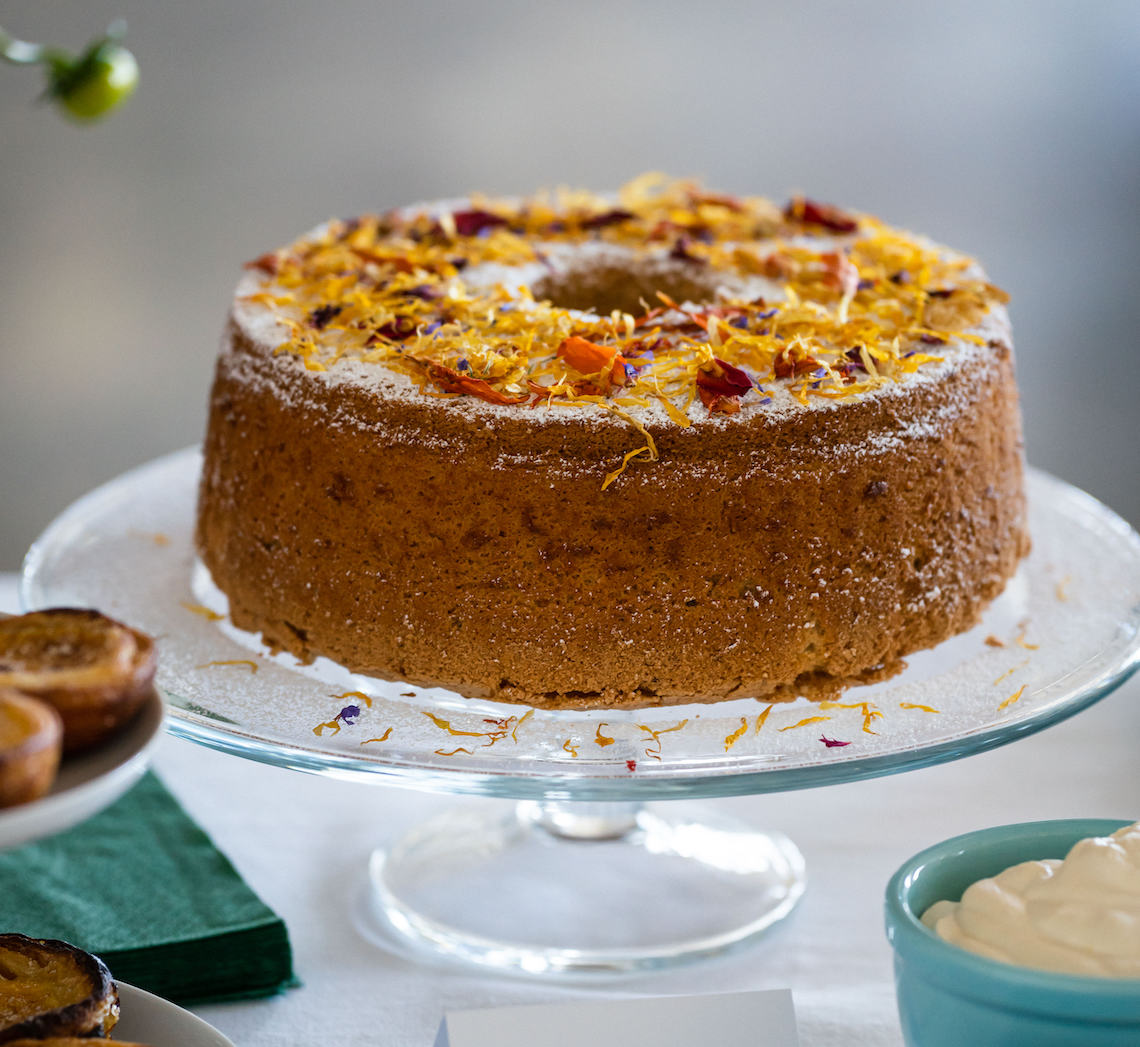
Created by Make Me a Baker student Jenny Wong for her graduation, this gorgeous cake is 'tea time' in a cake bringing together orange-scented chiffon cake and the subtle floral notes of French Earl Grey tea. And to make it complete, it's served with an Earl Grey tea-infused whipped cream and, of course a cup of freshly brewed French Earl Grey tea.
You will need a 21cm (base measurement) specialty angel food cake tin (basically a deep ring tin with a removable base and small 'feet' around the top rim) to make this recipe and they are available from specialty kitchenware stores. The key to achieving the classic feather-like texture of a chiffon cake is to make sure you leave it suspended in the inverted tin until cooled completely so that it doesn’t compress as it cools.
Ingredients
- 6 x T2 French Earl Grey tea bags
- 160ml ( ⅔ cup) boiling water
- 185g (1¼ cups) self-raising flour
- 30g (¼ cup) cornflour
- 1 teaspoon cream of tartar
- ½ teaspoon salt
- 6 x 59g eggs, at room temperature, separated
- 200g caster sugar, plus 110g (½ cup) extra
- 2 teaspoons finely grated orange zest
- 1 teaspoon natural vanilla essence or extract
- 100ml vegetable oil
- Icing sugar, to dust
- Dried edible flowers, to decorate (optional) (see Baker's Tips)
Earl Grey Whipped Cream
- 125ml (½ cup) full-cream milk
- 4 x T2 French Earl Grey tea bags
- 300ml thickened cream
- 1 ½ teaspoons finely grated orange zest
- 1 ½ teaspoons natural vanilla essence or extract
Method
- To make the Earl Grey Whipped Cream, place the milk and tea bags in a small saucepan and heat over medium heat until hot but not boiling. Remove form the heat and allow to cool. Transfer to a container or bowl, cover and place in the fridge to chill (preferably overnight).
- Preheat oven to 180°C (160°C fan-forced). Place an ungreased 21cm (base measurement) angel food cake tin on an oven tray.
- Place the tea bags in a jug, pour the boiling water over and set aside to infuse until the water is warm.
- Sift the flour, cornflour, cream of tartar and salt onto a piece of baking paper twice.
- Use an electric mixer with a whisk attachment to whisk the egg yolks and 200g caster sugar on high speed until thick and pale. Whisk in the orange zest and vanilla.
- Squeeze the tea bags to extract as much flavour as possible into the warm tea-infused water and measure 125ml ( ½ cup) - it should be dark in colour and very fragrant.
- Combine the warm tea and oil. Add the oil mixture to the egg mixture and whisk on low speed until well combined, scraping the side and the base of the bowl if necessary. With the motor running on low speed, add the flour mixture all at once and whisk gently until just combined. Transfer the mixture to a separate large bowl and set aside. Clean and dry the whisk and mixing bowl.
- Use the electric mixer with the whisk attachment to whisk the egg whites on medium-high speed until soft peaks form. Add the remaining 110g caster sugar and whisk until thick and glossy and the sugar has dissolved. Add about a third of the egg whites to the yolk mixture and use a large metal spoon or spatula to fold through until well combined. Add the remaining egg white mixture and fold until just combined.
- Spoon the mixture into the ungreased tin and gently smooth the surface with the back of a metal spoon. Bake in the lower third of the preheated oven for 45-50 minutes or until well risen, golden, and a skewer inserted into the cake comes out clean.
- Immediately turn the cake upside down on a wire rack and set aside, still in the tin so it is suspended, for 2 hours or until it is completely cool – don’t be tempted to remove it while still warm (see Baker's Tips).
- To finish the Earl Grey Whipped Cream, squeeze the tea bags to extract as much flavour as possible and then measure 60ml (1/4 cup) of the milk – it should be a pale Masala Chai colour and very fragrant. Use a balloon whisk the cream in a medium bowl until soft peaks form. Add the orange zest and vanilla and then whisk in the chilled Earl Grey-infused milk until soft peaks form again. Cover and chill until serving.
- Carefully run a small palette knife around the side of the tin to release the cake. Invert the cake onto a serving plate or cake stand, and gently shake the tin to release the cake. Then use the palette knife to release the cake from the base of the tin and remove (see Baker's Tips). Serve dusted liberally with icing sugar and edible flowers (if using), and accompanied by the Earl Grey Whipped Cream.
Baker's Tips
- The key to the classic light-as-air texture of a chiffon cake is to suspend the baked cake in an inverted tin until it cools completely so that the crumb texture doesn’t compress as it cools. That is why it is so important that the tin isn't greased or lined so that the cake sticks to the tin and that it doesn't fall out of the tin during cooling. However, because of this, once cooled you will need to carefully release it by running a small palette knife between the cake and the tin. You won’t get a perfect looking crust, but this will be overlooked as the result will be a beautifully airy crumb texture that can’t be achieved without using this technique.
- This cake is best cut with a sharp knife using a sawing action.
- This cake will keep for up to 2 days in an airtight container at room temperature but is best eaten on the day it is made.
- Jenny used sun-dried organic edible flowers from Percaya Farm
Prep 30min (+1hr cooling time)Bake 30minMakes 8-10 serves
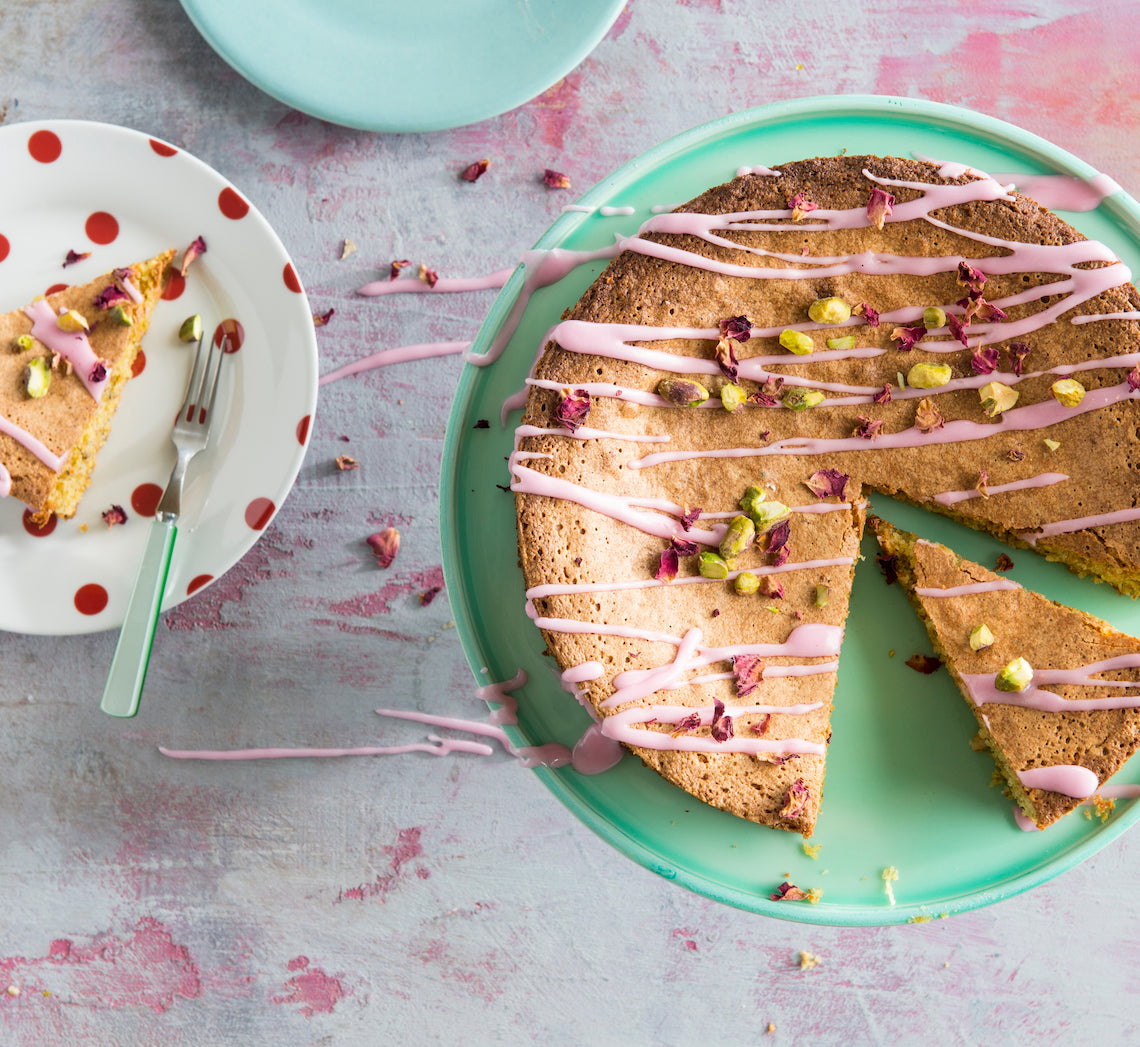
This gluten-free and dairy-free recipe, with its subtle lemon flavour teamed with an aromatic rosewater icing and light nutty texture, is the perfect afternoon-tea cake. It will dip slightly in the centre due to its delicate nature but this is just a sign of how lovely and light it is.
Ingredients
Light olive oil, to grease
100g (1 cup) almond meal
100g (¾ cup) raw unsalted pistachios, toasted and finely ground
90g (½ cup) instant polenta or wholegrain corn flour
2 teaspoons gluten-free baking powder
3 eggs, at room temperature
165g (¾ cup) caster sugar
125ml (½ cup) light olive oil
1 lemon, rind finely shredded, juiced
extra raw unsalted pistachios, toasted and coarsely chopped, to decorate
dried rose petals (optional), to decorate
Lemon and rosewater icing
125g (1 cup) pure icing sugar
1 tablespoon (about) strained fresh lemon juice
1 teaspoon rosewater
gluten-free pink or rose food colouring, to tint
Method
- Preheat oven to 180°C (160°C fan-forced). Brush a 20cm springform cake tin with olive oil and line the base with non-stick baking paper.
- Place the almond meal, ground pistachios, polenta and baking powder in a medium bowl and use a whisk to stir to combine and remove any lumps. Set aside.
- Use an electric mixer with a whisk attachment to whisk the eggs and sugar on medium-high speed until thick and pale and a ribbon trail forms when the whisk is lifted. Whisk in the olive oil, 2 tablespoons of the lemon juice and the lemon rind.
- Add the dry ingredients to the egg mixture and use a spatula or large metal spoon to fold until evenly combined. Pour into the prepared cake tin and bake for 30 minutes or until a skewer inserted in the centre comes out clean. Stand the cake in the tin on a wire rack for 10 minutes before removing the sides of the tin. Set aside to cool completely.
- To make the lemon and rosewater icing, sift the icing sugar into a medium bowl. Gradually stir in the 1 tablespoon lemon juice and the rosewater until the mixture is smooth and has a thick coating consistency, adding a little more juice if needed. Cover with plastic wrap and set aside at room temperature until ready to use.
- Drizzle the cooled cake with the icing and then sprinkle with extra pistachio nuts and dried rose petals, if using. Set aside for 30 minutes or until the icing has set before serving in wedges.
Baker's Tips
- This cake will keep in an airtight container at room temperature for up to 4 days.
This recipe is from Anneka's SBS Food online column Bakeproof: Gluten-free baking. Click here for more Bakeproof columns and recipes.
Photography by Alan Benson.
Prep 1hr45min (+ preparation time for Lemon Drizzle Pound Cakes, Swiss Meringue Buttercream and Striped Meringue Kisses)Bake 20minMakes about 20 serves
Created by Make Me a Baker student Janet Jackson for her graduation, this gorgeous cake brings together a selection of the techniques that she learnt during the 6-month program.
Janet said, "I love to bake cakes and have always admired decorated cakes but have never had the confidence to try one for myself. For my graduation bake, I wanted to bake and decorate a cake using produce from my garden at home and techniques I had learnt through the MMAB program. I trialled many different versions of lemon cake, some with poppy seeds and others with sour cream and Greek yoghurt, before settling on this delicious lemon drizzle cake which is lusciously moist and filled with the zing of freshly picked lemons."
Ingredients
Edible flowers, to decorate (optional)
3 Lemon Drizzle Pound Cakes
2 quantities Swiss Meringue Buttercream
5-15 yellow Striped Meringue Kisses
Lemon Curd
2 eggs, at room temperature
2 egg yolks, at room temperature
165g (¾ cup) caster sugar
80g unsalted butter, diced
2 tablespoons strained freshly squeezed lemon juice
Finely grated zest of 2 lemons
Lemon Crumb
60g unsalted butter, chilled, diced
80g plain flour
50g caster sugar
1 tablespoon strained fresh lemon juice
1 teaspoon finely grated lemon zest
Candied Lemon Curls
220g (1 cup) caster sugar
250ml (1 cup) water
½ lemon
Method
- To make the Lemon Curd, use a balloon whisk to whisk the whole egg, egg yolk and sugar in a medium saucepan until smooth. Add the butter, juice and zest and stir continuously with a wooden spoon until the mixture thickens enough to coat the back of a spoon (if you run your finger across the back of the spoon through the curd a line should remain when ready and the mixture should be 70°C on a sugar thermometer). Do not boil. Stain through a sieve into a bowl (see Baker’s Tips). Cover the surface of the curd with plastic wrap and place in the fridge for at least 2 hours before using.
- To make the Lemon Crumb, preheat oven to 180°C (160°C fan-forced) and line a baking tray with baking paper. Place all ingredients into the bowl of a food processor and process until the mixture just comes together in a dough. Use your fingers to press the dough onto the lined baking tray until about 3mm thick and bake in preheated oven for 10-12 minutes or until pale golden. Remove from oven and set aside to cool completely on the tray. Once cooled, break up the biscuit and process in the food processor again using the pulse button until a coarse crumb forms. Transfer the crumbs back to the lined tray and bake for a further 8 minutes or until golden. Set aside to cool on the tray (see Baker’s Tips).
- To make the Candied Lemon Curls, line a baking tray with baking paper. Use a vegetable peeler to remove the rind from the lemon in long strips. Use a small sharp knife to remove any white pitch from the rind and then cut the rind into long, thin strips. Combine the sugar and water in a small saucepan and stir over medium-low heat until the sugar dissolves completely. Add the lemon rind, bring to a simmer and simmer over medium-low heat for 20 minutes or until the rind is translucent. Remove the saucepan from the heat and use a skewer to remove the lemon strips, one at a time, from the syrup and twist around the round handle of a wooden spoon to make the curls. Allow to stand for about 5 seconds and then remove carefully from the wooden spoon by sliding off the end of the handle, using the skewer to help carefully release them if necessary. Set aside on the lined tray. Repeat with the remaining lemon rind strips.
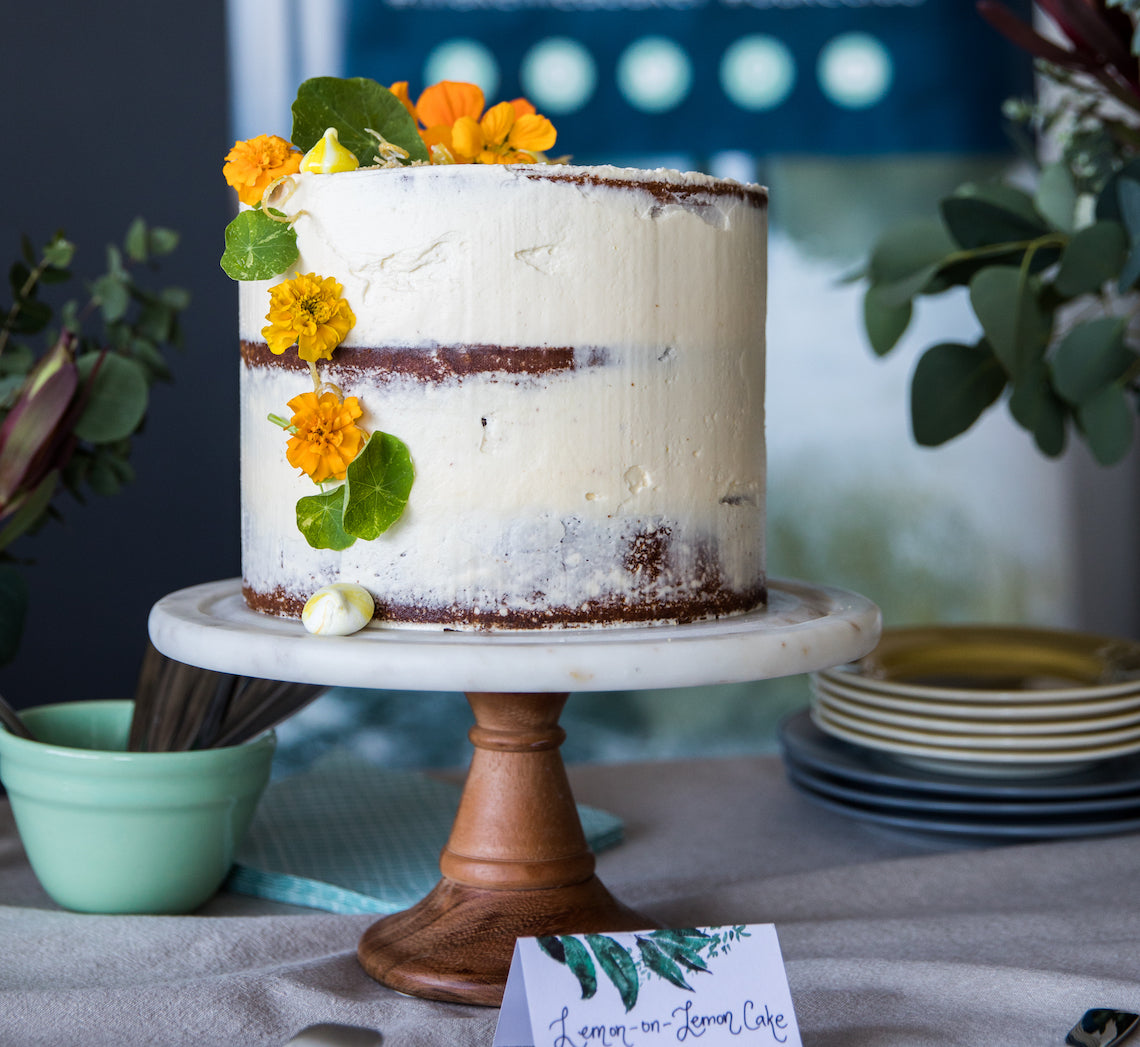
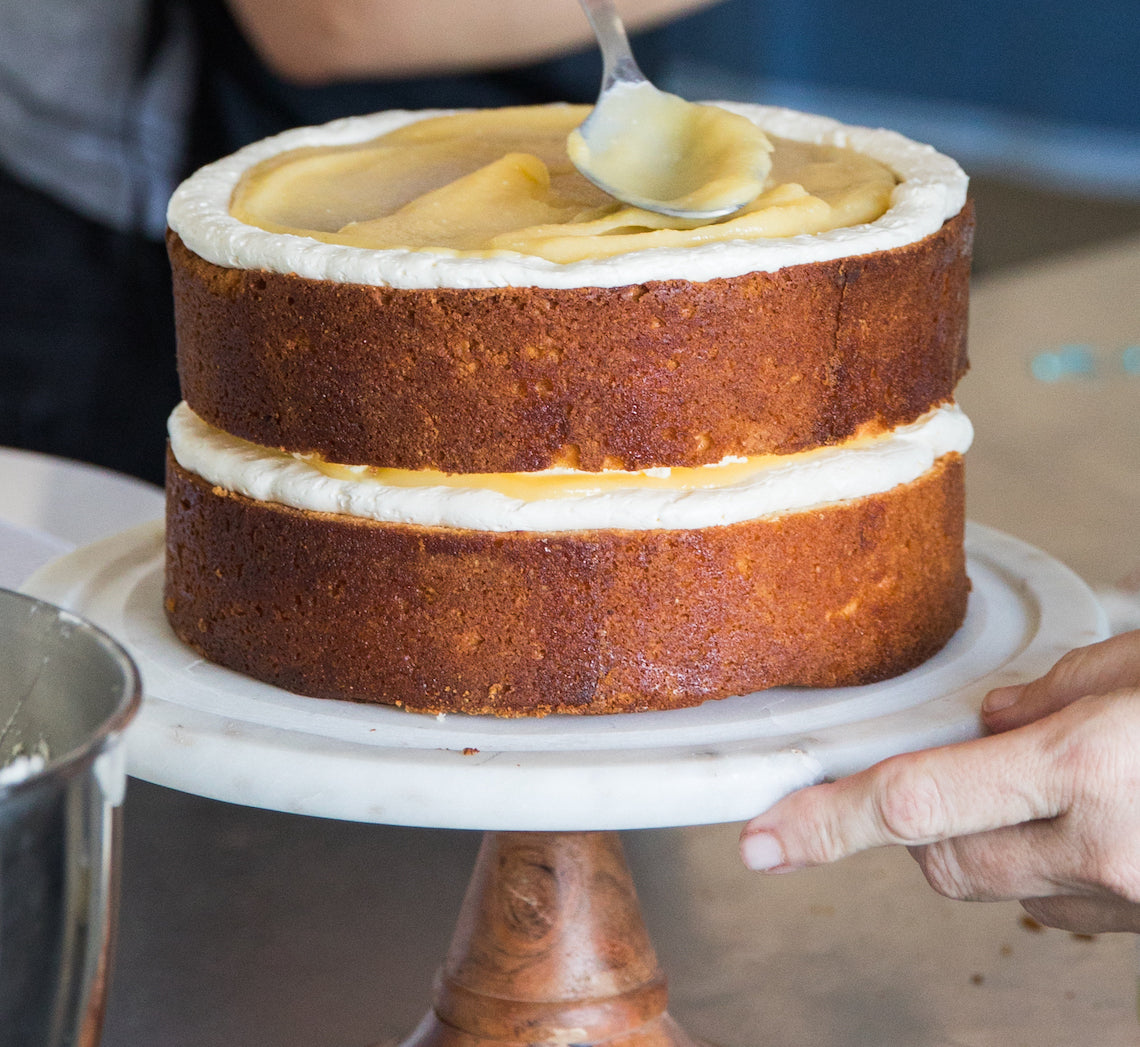
- To assemble the cake, use a large sharp serrated knife to level the tops of the Lemon Drizzle Pound Cakes if necessary. Place one of the cakes on a serving plate or cake stand. Spoon about a quarter of the Swiss Meringue Buttercream into a piping bag fitted with a #11 (1.1cm) round piping nozzle and pipe a border of buttercream around the top outside edge of the cake. Spoon about ⅓ cup of the chilled lemon curd into the centre of the cake and spread evenly to the buttercream. Spoon about ⅓ cup of the remaining buttercream in small dollops over the lemon curd and use a small palette knife or the back of a metal spoon to spread gently to cover the curd. Continue to layer the cake, curd and buttercream finishing with a cake layer.
- Spread the top and sides of the cake with the remaining buttercream creating a semi-naked look. Decorate with the Striped Meringue Kisses, Lemon Crumb and Candied Lemon Curls and embellish with fresh flowers if desired.
Baker's Tips
- This recipe will make about 1½ cups of Lemon Curd, but you will only need about 1 cup of the lemon curd for this cake. The leftover curd will keep in a sealed sterilized jar in the fridge for up to 2 weeks.
- The Lemon Crumb will keep in an airtight container or jar at room temperature for up to 2 weeks.
- The Lemon Curls will keep in an airtight container at room temperature for up to 1 week.
-
Janet baked the cakes the day before and let them stand overnight allowing the lemon drizzle to soak in. The Lemon Curd was made a couple of days ahead of time and stored in the fridge to thicken and develop flavour. She also made the Candied Lemon Curls and Lemon Crumb well ahead of time so she could concentrate on the assembly and decoration of the cake on the day of Graduation.
Prep 20min (+ cooling time)Bake 50-55minMakes 10 serves
Simple yet sublime. This pound cake is infused with a tangy lemon syrup and is perfect to serve on its own with a cuppa or used as a base for a more elaborate celebration cake. This recipe was originally published in BakeClass.
Ingredients
- Melted butter, to grease
250g unsalted butter at room temperature, cubed
220g (1 cup) caster sugar
Finely grated lemon zest of 1 lemon
4 eggs, at room temperature
250g (1⅔ cups) plain flour
2½ teaspoons baking powder
2 tablespoons strained freshly squeezed lemon juice
Lemon Syrup
55g (¼ cup) caster sugar
2 tablespoons strained freshly squeezed lemon juice
Method
- Preheat oven to 180°C (160°C fan-forced). Grease a 20cm (base measurement) round cake tin or springform pan with melted butter and line the base with baking paper.
- Using an electric mixer beat the butter, sugar and lemon zest in a large bowl until pale and creamy.
- Add the eggs one at a time, beating well after each addition.
- Sift together the flour and baking powder. Use a spatula to fold half of the flour mixture through the batter mixture. Fold in the lemon juice and then the remaining flour mixture until just combined.
- Spoon the batter into the prepared tin and smooth the surface with the back of a spoon. Bake in preheated oven for 50-55 minutes or until a skewer inserted in the centre comes out clean.
- Meanwhile, to make the Lemon Syrup, combine the caster sugar and lemon juice in a small saucepan and stir over medium heat until the sugar dissolves. Remove from the heat and set aside until the cake is cooked.
- Immediately after removing the cake from the oven, brush the top with a little of the syrup. Leave the cake to stand in the tin for 5 minutes before turning out onto a wire rack. Brush the top of the cake with the remaining syrup and set aside to cool.
Baker's Tips
- This cake will keep in an airtight container at room temperature for up to 2 days.
Prep 20min(+ 1hr cooling time)Bake 35-40minMakes 10 serves
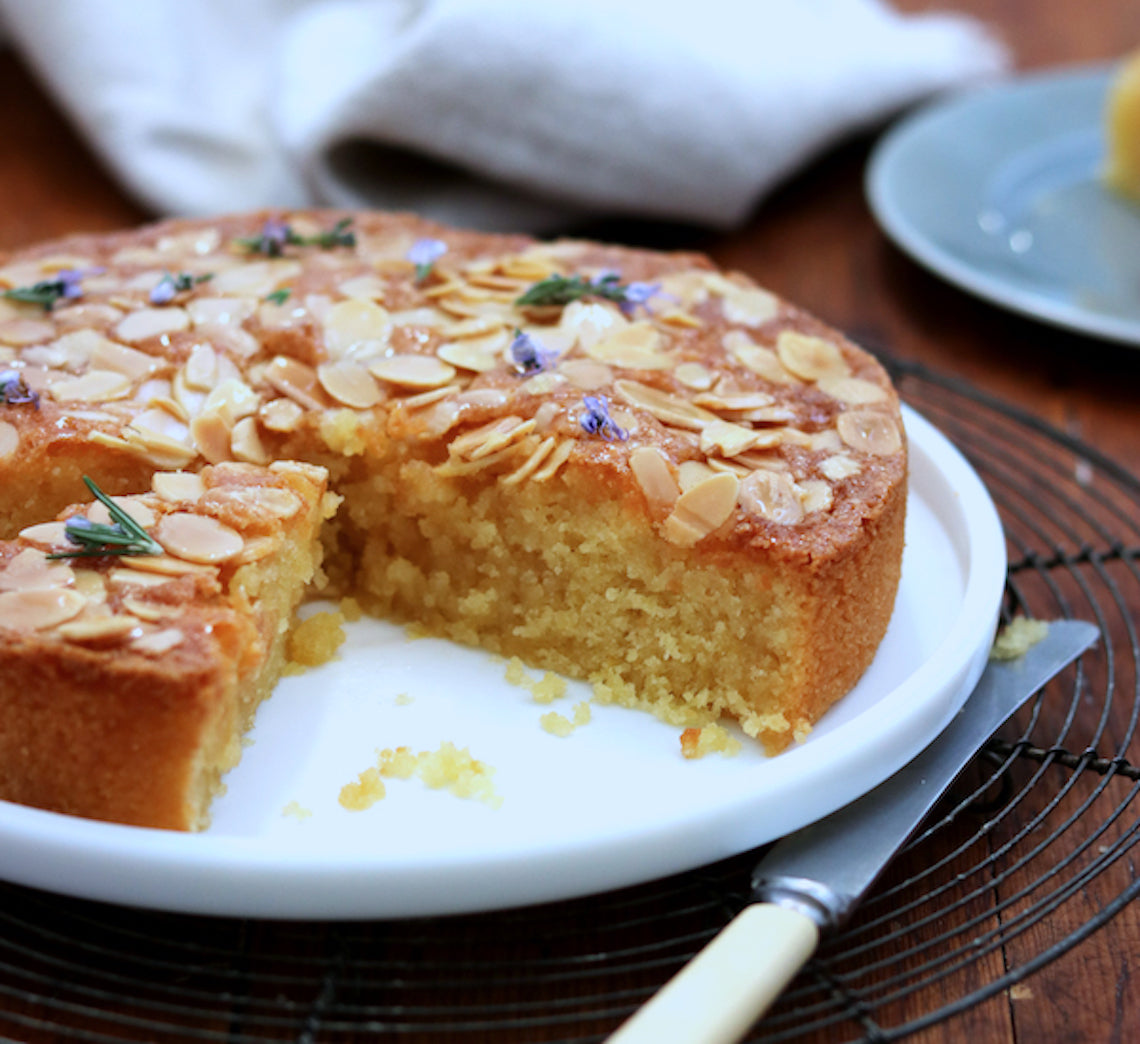
Inspired by the wild rosemary found growing on the Gallipoli peninsula and the symbolic wearing of sprigs as a sign of remembrance for those who have made the ultimate sacrifice, this cake is the perfect way to pay your respects through your baking on Anzac Day. It's a simple cake, made special by the rosemary-infused syrup and is equally good accompanied by a cup of tea or lashings of cream or vanilla ice-cream for dessert (particularly when served while still warm)!
Ingredients
Olive oil, to grease
150g (5¼oz) caster sugar
125g (4½oz) almond meal
75g (½ cup/2¾oz) self-raising flour
180ml (¾ cup/6fl oz) olive oil
3 eggs, at room temperature
2 lemons, rind finely grated
40g (1½oz) flaked almonds
Fresh rosemary flowers (optional), to decorate
Lemon & Rosemary Syrup
60ml (¼ cup/2fl oz) strained fresh lemon juice
60ml (¼ cup/2fl oz) water
110g (½ cup/4oz) caster sugar
4 x 10cm sprigs fresh rosemary
Method
- Preheat oven to 180°C/350°F (160°C/315°F fan-forced). Brush a 20cm/8in spring form tin with olive oil and line the base with non-stick baking paper.
- Combine the sugar, almond meal and flour in a large bowl. Whisk together the olive oil, eggs and lemon rind until well combined. Add to the almond meal mixture and use a balloon whisk or spatula to stir until just evenly combined.
- Pour into the prepared tin and spread with the back of a spoon. Sprinkle evenly with the flaked almonds. Bake in preheated oven for 35-40 minutes or until a skewer inserted in the centre comes out clean. Stand the cake in the tin for 5 minutes before turning transferring to a wire rack sitting over a tray.
- Meanwhile, to make the Lemon & Rosemary Syrup, combine the lemon juice, water and sugar in a small saucepan and stir over medium heat until the sugar dissolves. Add the rosemary sprigs, bring to a simmer and simmer for 5 minutes or until reduced by about half.
- Slowly pour the hot syrup over the warm cake, allowing it to soak in as much as possible. Cool to room temperature (this will take about 1 hour). Decorate with the rosemary flowers (if using) and serve in slices.
Baker's Tip
- This cake will keep in an airtight container at room temperature in a cool spot for up to 3 days.
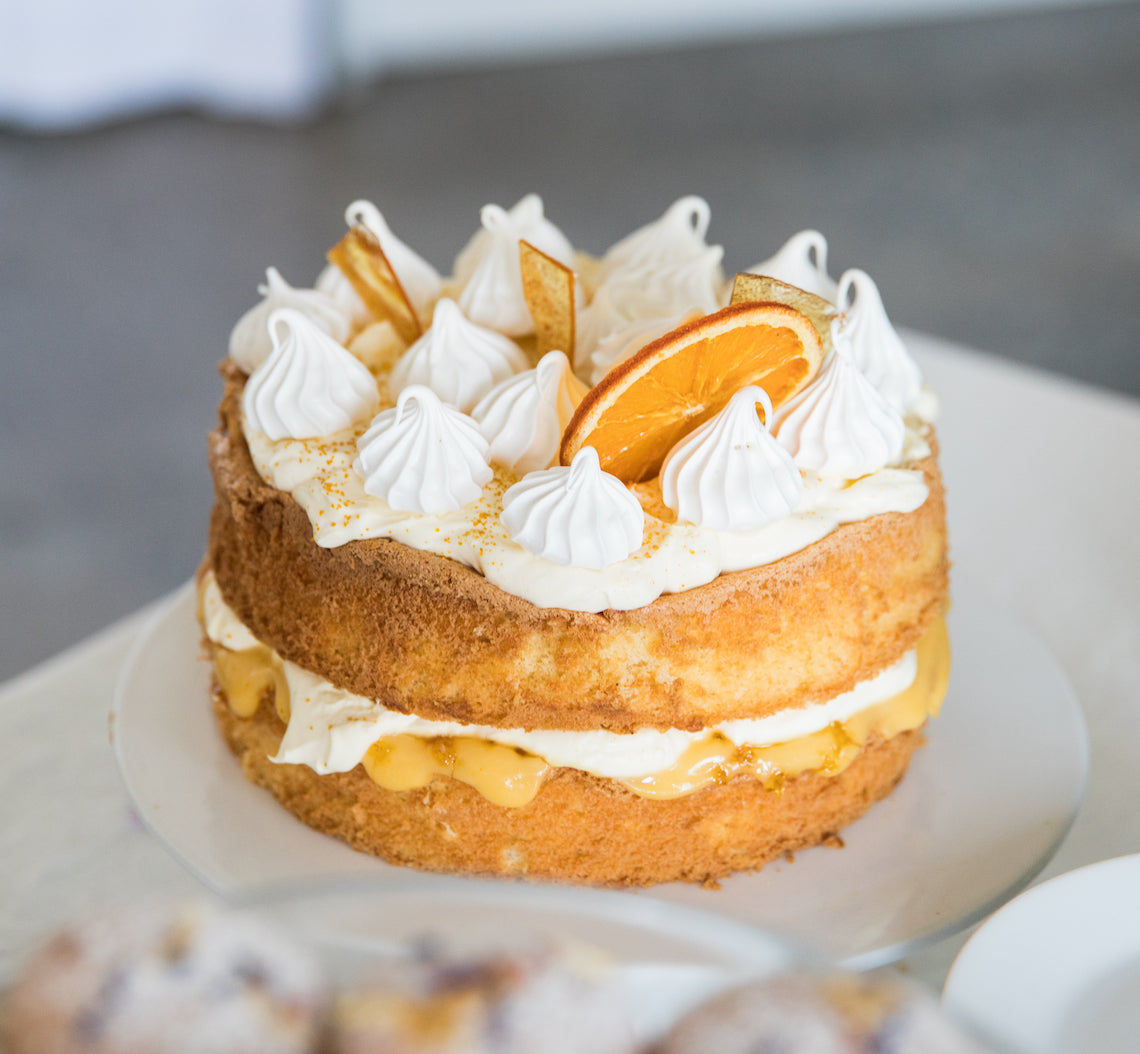
Prep 1.5hr (+ Meringue Rosettes prep)Bake 18-20minMakes 8-10 serves
An absolute must-try for any citrus fan, this light-as-air cake is the ultimate balance between light sponge, mouth-puckering lemon curd and beautiful hand-made adornments.
Created by Make Me a Baker student, Cate Tibbertsma for her graduation, this cake is a nostalgic one "that will fill your belly with sweet memories" as Cate says.
Ingredients
125ml (½ cup) thickened cream
125g (½ cup) sour cream
1 tablespoon pure icing sugar, sifted
1 teaspoon Citrus Dust (see recipe below), plus extra to sprinkle
Meringue Rosettes (get Cate's meringue recipe HERE), to decorate
Oven-dried orange slices (optional), to decorate
Lemon Curd
2 eggs, at room temperature
2 egg yolks, at room temperature
165g (3/4 cup) caster sugar
80g unsalted butter, diced
2 lemons, zest finely grated and juiced
Sponge Layers
Melted butter to grease
4 fresh eggs, at room temperature
1½ teaspoons natural vanilla essence or extract
165g (3/4 cup) caster sugar
60ml (1/4 cup) milk
30g butter, diced
110g (3/4 cup) self-raising flour
30g (1/4 cup) cornflour
Citrus Syrup
110g (½ cup) caster sugar
60ml (1/4 cup) strained fresh lemon juice
60ml (1/4 cup) strained fresh orange juice
Citrus Toffee Shards
Oil spray
100g caster sugar
2½ tablespoons water
1 tablespoon liquid glucose
½ teaspoon Citrus Dust (see recipe below), to sprinkle
Lemon Curd
- Combine the whole eggs, yolks and sugar in a small saucepan and stir with a whisk until smooth. Add the butter and the lemon juice and zest.
- Place the saucepan over a low heat and stir constantly with the whisk until thickened and the mixture reaches 75°C on a sugar thermometer.
- Strain through a sieve into a sterilised jar or glass container with lid. Refrigerate until required (see Baker’s Tips).
Citrus Toffee Shards
- Line a baking tray with non-stick baking paper and spray lightly with oil; set aside. Combine the caster sugar, water and the liquid glucose in a small saucepan. Stir over a low heat until the sugar dissolves. Stop stirring when it starts to boil and brush down the inside of the saucepan with a wet pastry brush to dissolve any crystals that have formed on the surface. Boil until the syrup turns a dark caramel colour (see Baker's Tips).
- Immediately pour the caramel over the entire surface of the baking sheet to create a thin layer. Sprinkle with the Citrus Dust. Set aside to cool and set. When completely cool, transfer to a sealed airtight container together with the baking paper.
Sponge Layers
- Position the oven rack in the middle of the oven and then preheat it to 180°C (160°C fan-forced). Brush two 18cm springform tins with melted butter to grease and line the base of each with a sheet of non-stick baking paper. Combine butter and milk in a small saucepan and set aside. Combine the Citrus Syrup ingredients in a separate small saucepan and set aside also.
- Use an electric mixer with a whisk attachment on medium-high speed to whisk the eggs and vanilla in a medium bowl until frothy. Add the sugar a spoonful at a time, whisking well between each addition, until the mixture is very thick and pale and the sugar has dissolved (this will take about 8 minutes). Lift the whisk out of the mixture and slowly draw a figure eight, if the trail stays on the surface long enough for you to finish drawing then the mixture is ready. If not, continue to whisk for a further minute and then test again.
- Meanwhile, heat the milk and butter in a small saucepan over medium heat until the butter melts and the mixture is almost simmering. Remove from the heat. Pour the hot milk mixture down the side of the bowl and then sift the flour and cornflour together over the egg mixture. Immediately whisk briefly again with the electric mixer on low speed, until the flour mixture is just incorporated (make sure there is no flour caught at the bottom of the bowl and be careful not to over mix).
- Divide the mixture evenly between the cake tins (see Baker's Tips) and gently tap the tins on the bench top three times to settle the mixture. Bake in preheated oven for 18-20 minutes or until the cakes are a pale golden colour, spring back when lightly touched in the centre and start pulling away from the sides of the tins.
Citrus Syrup
- About 5 minutes before the Sponge Layers finish baking, place the saucepan with the Citrus Syrup ingredients over a medium heat and stir until the sugar dissolves. Bring to a boil then reduce to a very gentle simmer to keep warm.
- Remove sponges from the oven and immediately use a small palette knife to loosen the top of the sponges from the tins and turn onto a wire rack lined with a tea towel. Remove the baking paper and carefully turn the hot sponges back on their base onto a rack over a tray. Immediately pour hot syrup over the hot sponge layers. Set aside to cool completely before layering.
To Assemble
- Use an electric hand mixer with a whisk attachment or a balloon whisk to whisk the thickened cream, sour cream and icing sugar together in a medium bowl, until soft peaks form.
- Place one sponge layer on a serving plate or cake stand. Spread about 1/2 cup of curd over the sponge layer and use a small sieve to sprinkle the Citrus Dust over the curd. Spread about half the cream mixture over the curd layer, spreading gently to avoid over-working the cream. Top with the remaining sponge layer. Spread another 1/2 cup of curd on top followed by the remaining cream mixture, again spreading gently so you don’t over work it.
- Decorate with the Meringue Rosettes and Citrus Toffee Shards and sprinkle with extra Citrus Dust. Embellish with oven-dried orange slices, if desired. Serve immediately or refrigerate for up to 2 hours (see Baker's Tips).
ORANGE CITRUS DUST: Preheat oven to 100°C (80°C fan-forced). Use a vegetable peeler to peel the rind from 1 large orange. Use a small knife to scrap any excess pith away. Place on a lined oven tray and bake in oven for 1-2 hours. Rind is ready when it has dried completely but still retains some of its original colour. Use a mortar and pestle or a small food processor to pound or process the rind to a fine powder that is aromatic and rich in colour. Store in an airtight container in a cool dry place for up to one month.
Baker's Tips
- The Lemon Curd will keep in a sealed clean, sterilised jar for up to 2 weeks in the fridge. My preference is to make and refrigerate the lemon curd 1-2 days in advance of using it so that the curd thickens and the flavour develops.
- As the Citrus Toffee Shards syrup begins to darken, gently turn the pan to encourage the colour to spread but avoid swirling the mixture too vigorously to prevent the mixture from crystallising.
- The Citrus Toffee Shards will store at room temperature in an airtight container for up to a month, depending on the humidity.
- Having your butter and milk mixture for the Sponge Layers and the Citrus Syrup ingredients in separate saucepans, ready for heating, will make the preparation of this recipe more efficient and with help with the timing of when the different elements need to be ready.
- To divide the mixture evenly between the tins, weigh the tins with the mixture in them to make sure they are the same weight. Placing a small upturned bowl on the scale and for the cake tin to sit on will mean that the measurement display window can be easily viewed.
- Even though this cake is best eaten on the day it is baked, the unfilled syrup-infused sponge layers can be made the day before serving. Store in an airtight container at room temperature. To avoid the layers sticking to each other, separate the sponges with a layer of baking paper or store in two separate airtight containers. An upturned cake tin, larger than the diameter of the cake, also makes a useful barrier for separating sponges for storing.
- To ensure this cake cuts easily, resist over-filling the middle layer of curd and cream and, if possible, chill the assembled cake for a few hours before serving. Decorate with the meringues, toffee shards and citrus dust just before serving.
Prep 11/2hr (+ standing time) Bake 15min (per batch) Makes about 28
Pretty to look at, divine to eat, these macarons were created by Allen Au, one of our Make Me a Baker graduates, to use as part of his Graduation cake recipe.
Ingredients
125g almond meal
125g pure icing sugar
96g egg whites
125g caster sugar
30ml water
Gel colouring (see Baker's tip)
Filling
125g unsalted butter
125g pure icing sugar, sifted
1 tablespoon sieved cherry jam
Method
- Preheat oven to 165°C (145°C fan-forced). Line two large oven trays with non-stick baking paper or silicone baking mats.
- Sift together the almond meal and icing sugar into a large bowl. Add half the egg white and mix until a thick paste forms.
- Combine the caster sugar and water in a small saucepan and stir over medium heat until the sugar dissolves. Bring to a boil and simmer over medium heat, brushing down the sides of the saucepan with a wet pastry brush occasionally to prevent any sugar crystals forming. Do not stir. Once the sugar mixture has reached 115°C on a sugar thermometer, use an electric mixer with a whisk attachment to whisk the remaining egg white on medium-high speed until soft peaks form. Once the sugar mixture has reached 118°C, remove the saucepan from the heat and slowly whisk the hot sugar mixture into the egg whites. Continue to whisk on medium-high speed until the temperature cools to 30°C. The meringue should be thick and glossy. Add enough gel colour to the meringue to tint to the desired colour, whisking until evenly combined.
- Fold 2 large tablespoons of the meringue into the almond paste mixture until well incorporated. Fold in the remaining meringue until evenly combined. The consistency of the batter should look like molten lava. If you can draw a figure eight and the trail stays on the surface, then the mixture is ready to be piped.
- Spoon the mixture into a piping bag fitted with a 10mm round nozzle. Pipe the macarons onto the lined trays into 3.5cm rounds. Tap the tray to remove any air bubbles from the macarons. Leave the macarons out in the open until a skin forms on the surface of the macaron. (This can take from 20 minutes to an hour depending on the humidity). The skin should be dry enough that it does not stick to your finger when touched lightly.
- Bake one tray of macarons in the centre of the preheated oven for 15 minutes or until shells don't feel soft at the 'feet' when touched. Set aside to cool on the tray and repeat with the remaining tray of macarons.
- To make the Filling, use an electric mixer to beat the butter until it is pale and creamy. Beat in the icing sugar until well combined. Add the cherry jam and beat until well combined. Spoon the filling into a piping bag fitted with a 7mm star nozzle and pipe a small rosette onto the base of half the macarons. Sandwich with the remaining macarons.
- Store the macarons in the fridge overnight so the flavours from the filling are absorbed by the shells. Bring the macarons to room temperature before serving.
Baker's Tips
- Allen used Chefmaster Liqua-Gel colours to colour his macarons – he used 8 drops of Super Red with 0.5 drop of Black Diamond
- This recipe is based on a recipe from a course Allen did with Australian Patisserie Academy
Prep 11/2hr (+ macaron prep)Bake 18-20min (per batch)Makes 10 serves
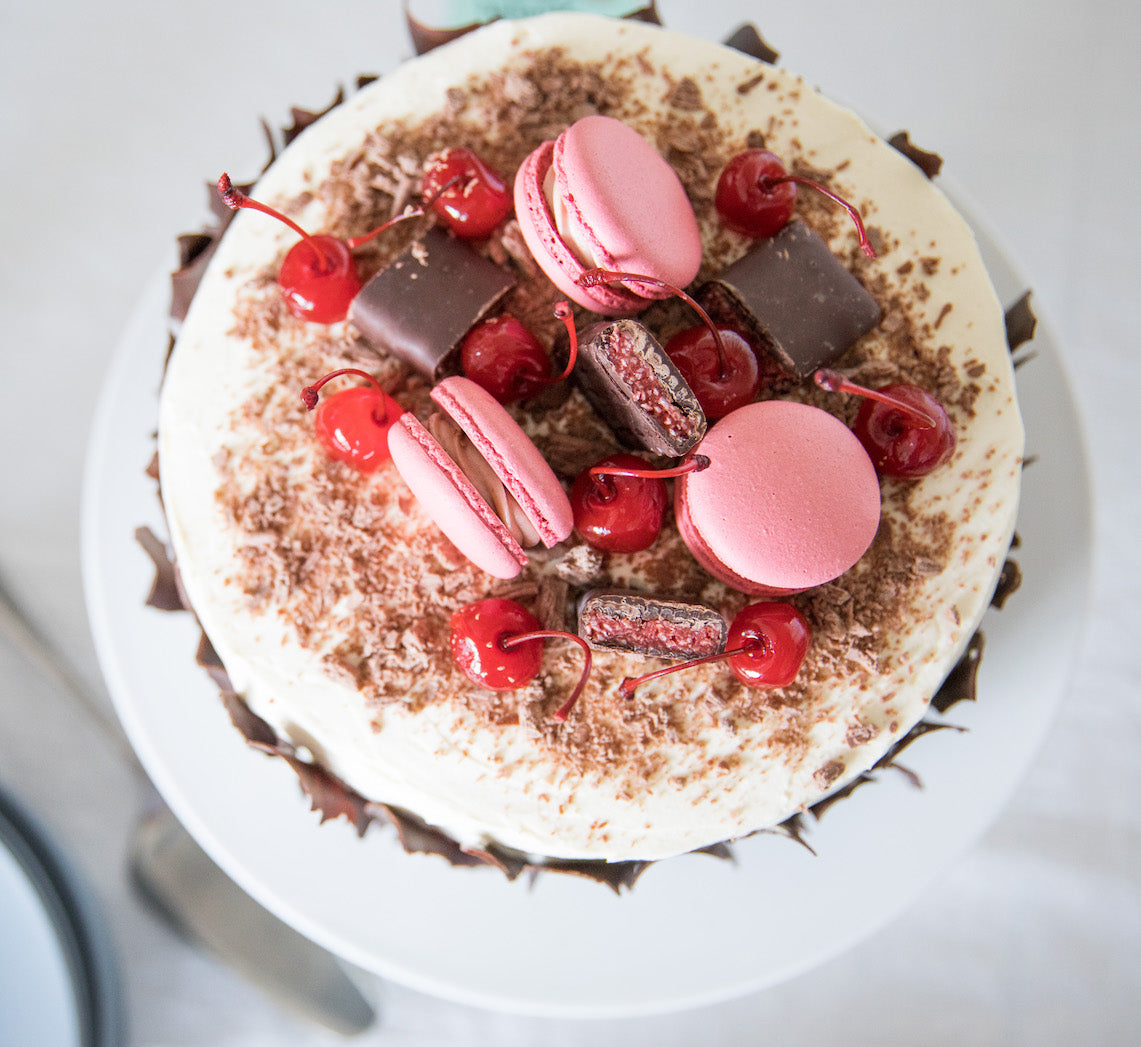
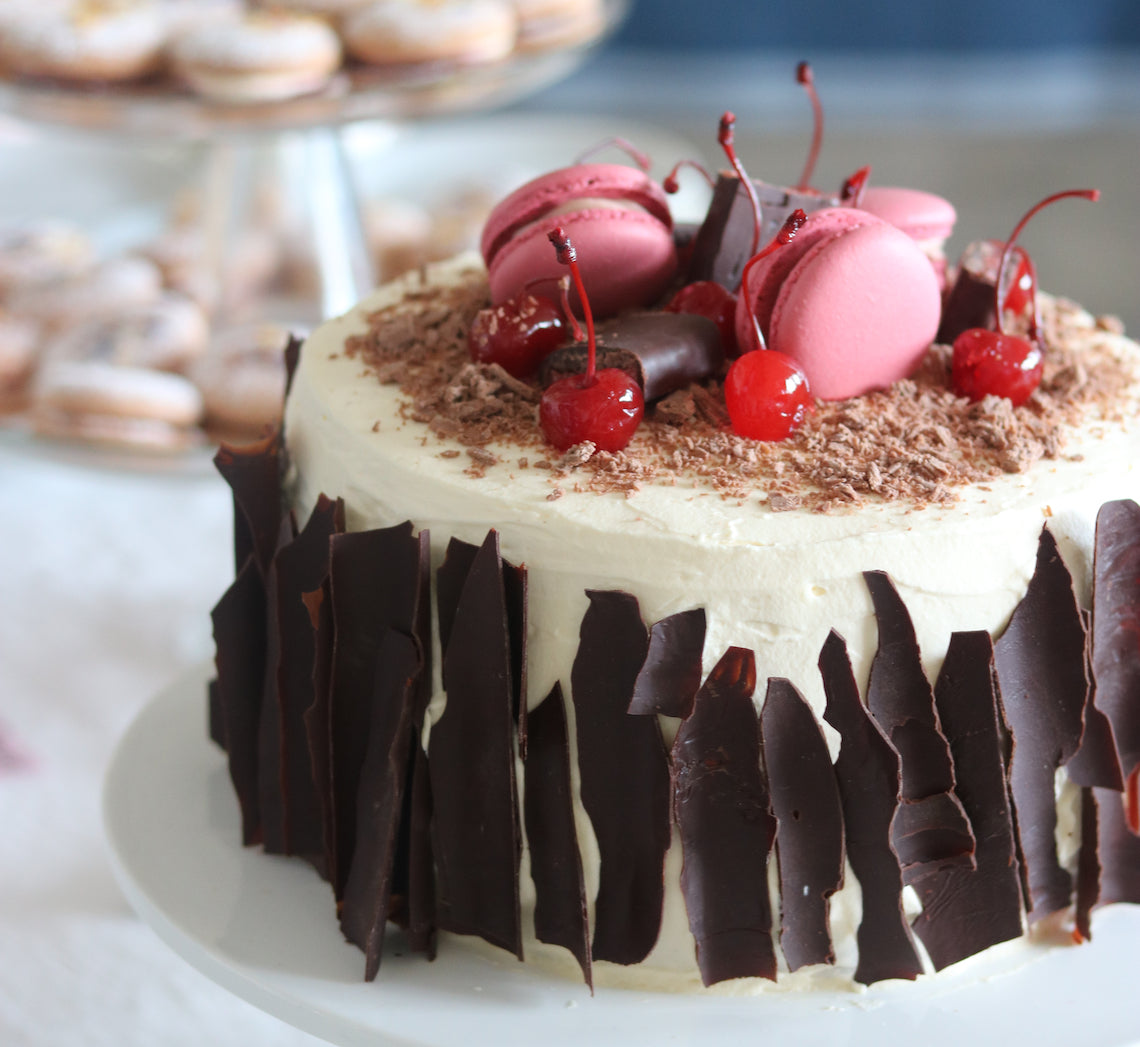
Created by Make Me a Baker student, Allen Au for his graduation, this cake is certainly a show stopper.
Before starting the program Allen had always found making sponge cakes challenging and had almost given up on ever making another again. But, he set himself the challenge of perfecting a sponge and creating a version of Black Forest cake that his wife had always wanted him to. The result was a modern cake bursting with flavour and showcasing Allen's newly-acquired baking skills!
The sponge cake in this recipe is a version of the one students learn to make during the Make Me a Baker program.
Ingredients
Chocolate Sponge Cake (2 layers)
Melted butter, to grease
4 eggs, at room temperature
150g caster sugar
60ml milk
30g salted butter
110g self-raising flour
30g cocoa powder
Chocolate Sponge Cake (1 layer)
Melted butter, to grease
2 eggs, at room temperature
75g caster sugar
30ml milk
15g salted butter
55g self-raising flour
15g cocoa powder
Kirsch Syrup
80g caster sugar
90ml water
60ml kirsch
To Assemble
900ml thickened cream
200g cherry jam
1½ x 680g jars pitted Morello cherries, drained
To Decorate
Chocolate bark (see Baker's tips)
10 Maraschino cherries with stems, drained
2 Cadbury Cherry Ripe double-dipped chocolate bar, cut into 3-4 pieces
1½ Cadbury Flake bar, broken into fine pieces
3 cherry macarons (get Allen's Cherry Macaron recipe HERE)
Chocolate Sponge Cake Layers
- To make the Chocolate sponge cake layers, place the oven rack in the oven so that the cake tins will sit in the middle of the oven and then preheat to 180°C (160°C fan-forced). Brush two 20cm shallow cake tins with melted butter to grease and line the base of each with a sheet of non-stick baking paper. You will need to reuse one of the cake tins to make the third sponge layer later.
- To make the first two layers of sponge, use an electric mixer with a whisk attachment on medium-high speed to whisk the 4 eggs in a large bowl until frothy. Add the sugar a spoonful at a time, whisking well after each addition, until the mixture is very thick and pale (this will take about 8 minutes). Lift the whisk out of the mixture and draw a figure eight. If the trail stays on the surface long enough to finish drawing, then the mixture is ready. If not, continue to whisk for a further minute.
- Meanwhile, heat the milk and butter in a small saucepan over medium heat until almost simmering. Remove from the heat and pour the warm milk mixture down the side of the mixing bowl. Quickly sift the flour and cocoa powder together over the egg mixture and then immediately whisk again with the electric mixer on low speed briefly until the flour mixture is just incorporated (be careful not to overmix). Scrape the base of the bowl and then whisk briefly again, if necessary.
- Divide the mixture evenly between the cake tins (see Baker’s tips) and gently tap the tins on the benchtop three times to settle the mixture. Bake in preheated oven for 18-20 minutes or until the cakes spring back when lightly touched in the centre and start pulling away from the sides of the tins. Remove from the oven and immediately use a small palette knife to loosen the sides of the sponges from the tins and turn onto a wire rack to cool completely.
- Repeat steps 1–4 using the ingredients to make one more layer of sponge.
Kirsch Syrup
- Combine the caster sugar and water in a small saucepan. Stir over medium heat until the sugar dissolves. Bring to the boil and then remove from the heat. Stir in the kirsch. Set aside to cool to room temperature.
To Assemble
- When ready to assemble the cake, use a stand mixer or electric hand mixer with a whisk attachment to whisk the cream until soft peaks form. Place one of the sponge layers on a serving plate or cake stand. Use a pastry brush to generously brush the whole top surface with about one-third of the kirsch mixture. Spread half the jam over the top and then spread with enough whipped cream to create a layer about 1cm thick. Sprinkle with half the drained morello cherries. Repeat with the remaining sponge layers, kirsch syrup, morello cherries and cream layer, finishing with a sponge layer and kirsch syrup.
- Spread the remaining whipped cream over the sides and top of the cake to cover.
- To decorate, attach the chocolate bark to the outside of the cake. Decorate the cake with the Maraschino cherries, chocolate bars, and macarons.
Baker's Tips
- To divide the mixture evenly between the tins, weigh the tins with the mixture in them to make sure they are the same weight.
- To make chocolate bark, spread melted dark chocolate thinly over a piece of baking paper, making sure the width is similar to the height that your final cake will be. Place a second piece of baking paper over the chocolate to cover. Roll the two sheets of baking paper together into a thin cylinder. Secure with bulldog clips or pegs on both ends. Place in the fridge until set and ready to use. To use the chocolate bark, carefully remove the baking paper and break to desired widths.
Prep 20min (+1hr 30min cooling time)Bake 30-35minMakes 10-12 serves
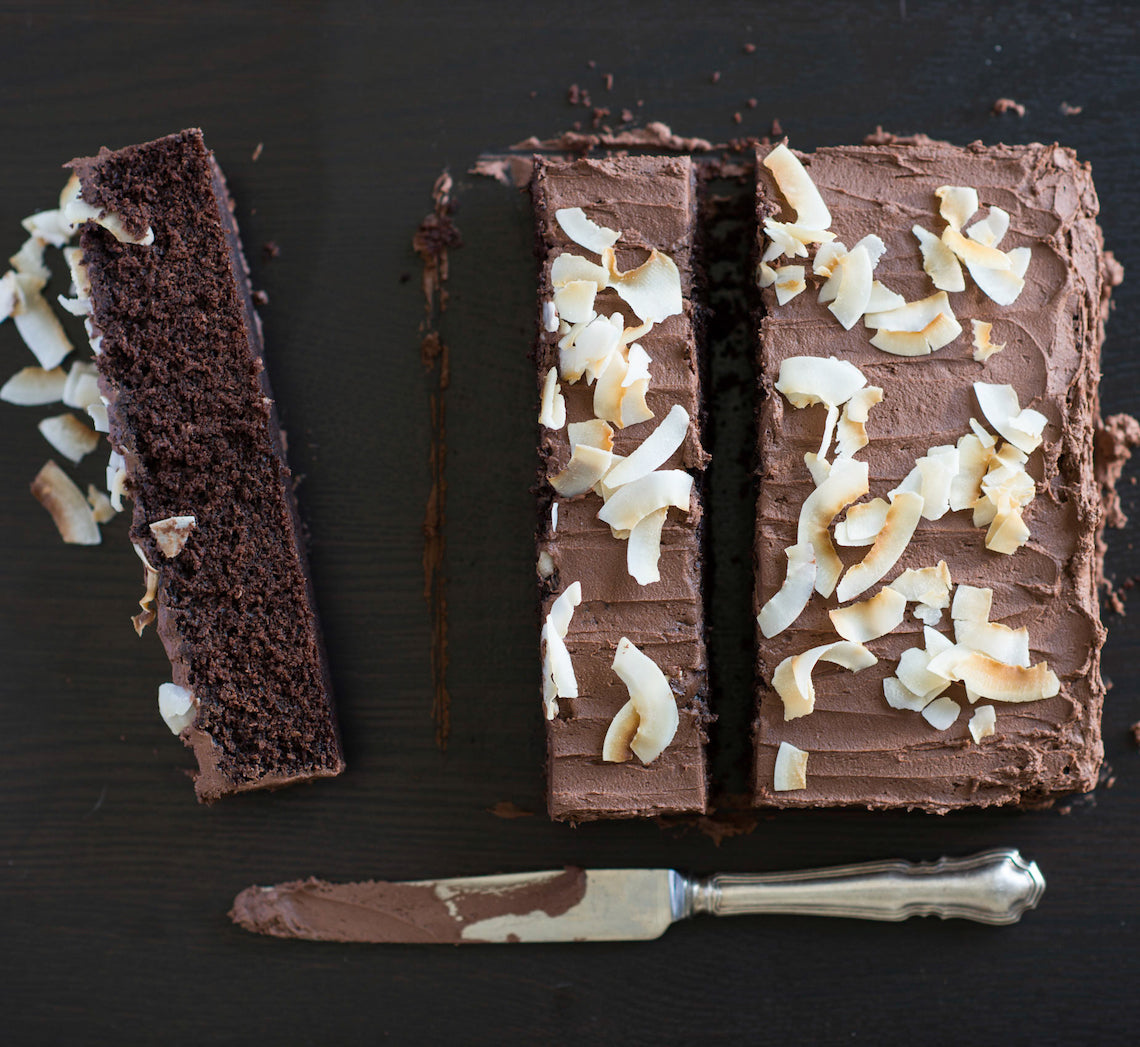
Everyone needs a good old-fashioned chocolate cake in their repertoire that is easy enough to whip up on a whim. Made with a simple melt-and-mix method this delicious cake is a real crowd-pleaser.
Ingredients
Melted butter, to grease
125g salted butter, diced, at room temperature
220g (1 cup) caster sugar
185ml (¾ cup) milk
2 eggs, at room temperature, lightly whisked
2 teaspoons natural vanilla essence or extract
150g (1 cup) self-raising flour
55g (½ cup) cocoa powder
1 teaspoon baking powder
45g (½ cup) desiccated coconut
Chocolate buttercream
125g salted butter, at room temperature
185g (1½ cups) icing sugar mixture, sifted
2 tablespoons cocoa powder, sifted
Method
- Preheat oven to 180°C (160°C fan-forced). Grease a square 20cm cake tin with melted butter and line the base with non-stick baking paper.
- Combine the butter, sugar and milk in a medium saucepan. Stir over medium heat until butter melts, sugar dissolves and mixture is combined (see Baker's Tips). Remove from heat and use a fork to whisk in the eggs and vanilla.
- Sift together the flour, cocoa powder and baking powder into a large bowl. Stir in the coconut. Add the butter mixture and use a balloon whisk to stir until just combined.
- Spoon the mixture into the prepared tin and use the back of a metal spoon to smooth the surface. Bake in preheated oven for 30-35 minutes or until a skewer inserted into the centre of the cake comes out clean. Stand in the tin for 5 minutes before turning onto a wire rack to cool (this will take about 1½ hours).
- To make the Chocolate buttercream, use an electric mixer to beat the butter, icing sugar and cocoa powder in a medium bowl until pale and creamy and it is a smooth spreadable consistency. Spread the cooled cake with the buttercream and cut into portions to serve.
Baker's Tips
- Don’t overheat the butter mixture – as soon as the butter melts and the sugar has dissolved, remove it from the heat.
- This cake will keep in an airtight container at room temperature in a cool spot for up to 3 days.
This recipe is from Anneka's SBS Food online column, Bakeproof: Easy Chocolate Cakes. CLICK HERE for more Bakeproof recipes.
Photography by Alan Benson.


